Automated deployments with Docker, Ansible & Go (Part 1 of N)


I have been experimenting with using Go CD, Ansible and Docker as a means of automating deployments. This post and the subsequent ones document what needs to be done to achieve seamless deployments. The first part of this series will deal with installing and configuring Docker.

Installing Docker

If you have never heard of Docker the following links explain what Docker is? and highlight the key differences between containers and VMs see

Now that we know what Docker is? differences between Containers and Virtualization and a few basic commands we can jump right into the thick of things and start setting up a container.

Note: I tried this on Ubuntu but the steps should be pretty much the same for CentOS or any other variant of Linux.

Installing Docker on Ubuntu

Install docker by following the instructions here. Once installed verify that docker is running by typing

First steps

Download and start a container

sudo docker run -i -t ubuntu /bin/bash

If you are behind a proxy and docker fails to fetch the images, try setting proxy in /etc/default/docker. The command above will download the ubuntu docker image and then launch and Initialize it. because we ran docker in interactive mode (-i) docker will drop you into the container’s shell. CTRL+D to exit.

To start a docker container as a daemon/running in the background use the -d option, One of the most common mistakes is to choose a process that exits right after the container starts, any process that runs inside the container needs to keep running either as a daemon or in the background with ‘&’. If the process inside the container exits then the the container also exits.

Interacting with containers

to see running containers use the command

docker ps

To see all containers even the ones that have exited use

docker ps -a

to attach to a daemonized container first get the containers ID and then use that with docker’s attach command

docker attach container_id

to restart a stopped container or to pause a container use

docker start container_id
docker pause container_id

to unpause a paused container use

docker unpause container_id

Cleanup

Docker does not come with a cleanup command yet, you can use a little bash fu

docker ps -a | grep "weeks ago" | awk '{print $1}' | xargs docker rm

you can grep for “days ago” or “hours ago”

or to delete all containers

docker ps -a -q | xargs docker rm

Sharing folders

To mount a host directory in the container use the -v option

for e.g

docker run -v /tmp:/tmp/source -t -i ubuntu /bin/bash

this should mount host directory /tmp to container directory /tmp/source

you can use apt-get in download only mode with the -d option to download packages and save then in the shared folder. On the host the apt-get -d option downloads the packages to /var/cache/apt/archives

download and copy any packages you need to install into the hosts /tmp directory then install it from within the container.

Saving changes to the container

Once the container is customized to your liking, you need to save the changes to do this use the commit command

docker commit container_id image_name

Note: when run in interactive mode the container ID will part of the bash prompt e.g

root@664cbf2186cb:/tmp/source#

else you can get the container ID by executing the docker’s ‘ps’ command.

Docker networking

By default Docker sets up a network interface called docker0 and assigns a private IP in the 172.x range to this interface, this will be a non-routable address and cannot be reached from the host or the external network. Docker also supports networking between containers using the link command. If you want the docker image to be reachable from the host and outside network there are a couple of ways to achieve this

  • create a bridge with the active interface.
  • Port forwarding
Bridge network

on ubuntu first install bridge-utils on the host via apt-get

sudo apt-get install bridge-utils

Then install pipework. To install first download the shell script

save it in /usr/bin as pipework and then make it executable.

To start a container in bridge mode:

ubuntu=$(docker run -v /tmp:/tmp/source -d phusion/baseimage /usr/bin/weborf &)
pipework br1 $ubuntu 192.168.1.1/24
ip addr add 192.168.1.254/24 dev br1

Port forwarding

Forwarding a port on the container to the docker host is easy, use the -p option to map a port from the container to a port on the host.
Note: that the docker container still uses the default IP address in the 172.x.x.x range. Anything not explicitly forwarded will still be inaccesible.

Docker has two options for port forwarding, EXPOSE and -p option. The difference between these two is that EXPOSE only exposes the port to other docker containers but not to host or external network. the -p option exposes port to host and external network. The -p option implicitly calls the EXPOSE command.

Next post will deal with

  • Networking between containers
  • Security
  • Docker files
  • Private repositories

References:
How to remove old docker.io containers
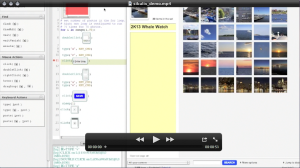
Automating date change on Flickr photos with SikuliX


I recently migrated several gigabytes of photos from Google Plus photos (formerly Picasa) to Flickr. Flickr provides a generous 1TB of data, allows full resolution images and videos and has a thriving community. This was a great opportunity to backup and showcase my photos. I began migrating photos but I hit a serious usability issue. The Flickr photostream is sorted according to the date on which photos are uploaded. There is no option to organize the photos by date taken. This meant that my entire photostream was organized by a single date (the date on which I uploaded all of these photos). The fix was to change the uploaded date to the date the pictures were taken. This meant that I would have to go thru thousands of photos and videos and manually change the date. This was a daunting task that would have taken me the entire weekend. Being a QA/Automation engineer in my day Job I thought surely there must be a faster and easier way to do this.

I found Sikuli a visual automation tool, which can be used to quickly automate things like filling forms, clicking buttons etc and has a much easier learning curve when compared to Selenium or iMacros. With Sikuli my workflow mimicked what I would have done manually.

  1. Click on You>Organize menu item & then on the “sets & collections” ta
  2. Click a photo set to edit, double click on the first photo in the set
  3. Switch to “Dates” tab.
  4. Copy the date in the “Date taken” field
  5. Paste the copied date into the “Date uploaded” field
  6. Check the “go to next item when you save?” box if unchecked
  7. Press save and advance to next photo.

With the Sikuli Script All I had to do was select the set, bring up photo properties, switch to date tab. Edit the sikuli script and update the total number of photos in the set. Run the automation script. What should have taken days took me about 2 hours flat. Take a look at the video below to see it in action.

SikuliX & Flickr demo

SikuliX & Flickr demo

SikuliX can be downloaded at http://www.sikuli.org/

One line shell script to delete all lines starting from a specific pattern to the end of file


At work today I had to run a lot of SQL files which had  –-//@UNDO  followed by SQL commands to rollback the transactions  carried out at the top of the file. This is standard for SQL migration files, However MySQL server errors out when it encounters this. I used a quick shell script to remove all the –//@UNDO and all the SQL commands which followed it.

for i in *; do echo "Processing" $i; sed '/\-\-\/\/@UNDO/,$d' $i > /tmp/$i; done;

The above line will delete all lines starting from –-//@UNDO until the end of file. The modified contents are then written to /tmp. The original file remains unchanged.

Installing TinyPM agile project management software on Ubuntu


  1. Download TinyPM war for tomcat 6.x from here
  2. Install tomcat 6.x  and mysql-server (5.x)
    sudo apt-get install tomcat6 mysql-server
  3. Download mysql connector / j from mysql website (5.x)
  4. Go to /usr/share/tomcat6/lib copy the files in the dependency folder of the tinypm zip file downloaded in step 1. Copy the MySQL connector jar file here.
  5. Create a database using the following commands
    CREATE DATABASE tinypmdb CHARACTER SET = 'utf8' COLLATE = 'utf8_general_ci';
  6. Create a user with SELECT, UPDATE, INSERT, LOCK TABLES and DELETE rights:
    GRANT SELECT, UPDATE, INSERT, LOCK TABLES, DELETE ON tinypmdb.* TO 'username'@'localhost' IDENTIFIED BY 'password';
    FLUSH PRIVILEGES;
  7. Run scripts to create the tinyPM database schema and data (instructions provided here are for MySQL console application):
    u tinypmdb
    . %PATH_TO_INSTALL_FOLDER%/sql/mysql/create_schema-2.x.sql
    . %PATH_TO_INSTALL_FOLDER%/sql/mysql/create_data-2.x.sql
  8. Create search index using commands
    sudo mkdir /var/search_index /var/search_index/tinypm
    sudo chown -R tomcat6:tomcat6 /var/search_index/tinypm
  9. Create /var/lib/tomcat6/webapps/tinypm, extract the contents of the war file into this folder.
  10. Edit /var/lib/tomcat6/webapps/tinypm/WEB-INF/classes/hibernate.properties and enter the MySQL db details. uncomment the last line
    #hibernate.search.default.indexBase = /var/search_index/tinypm
  11. Restart tomcat with sudo service tomcat6 restart, visit http://localhost:8080/tinypm (default credentials are admin/admin)

How to install FreeNX server and client on Ubuntu


  1. Add the FreeNX team repo
      sudo add-apt-repository ppa:freenx-team
  2. Install FreeNX
    sudo apt-get update && sudo apt-get install freenx
  3. Apply Patch
    wget https://bugs.launchpad.net/freenx-server/+bug/576359/+attachment/1378450/+files/nxsetup.tar.gz && tar xvf nxsetup.tar.gz && sudo cp nxsetup /usr/lib/nx
  4. Setup NoMachine keys
      sudo /usr/lib/nx/nxsetup --install --setup-nomachine-key
  5. Import public key for server
    sudo cp /usr/NX/etc/keys/node.localhost.id_dsa.pub /tmp/node.localhost.id_pub.save
    sudo /usr/NX/bin/nxnode --keyadd /tmp/node.localhost.id_pub.save
    sudo  nx:root /usr/NX/bin/nxserver --keygen
    sudo chown nx:root /usr/NX/home/nx/.ssh/authorized_keys2
    sudo chmod 0644 /usr/NX/home/nx/.ssh/authorized_keys2
    sudo mv /usr/NX/home/nx/.ssh/authorized_keys2 /usr/NX/home/nx/.ssh/autohriazed_keys --
  6.  Add new user using useradd, then add this username to /etc/ssh/sshd_config under AllowedUsers (multiple usernames can be specified with spaces separating the names)
  7.  check if the user is ableto login to NXServer bu uisng command
    sudo /usr/NX/bin/nxserver --usercheck
  8. Add the following  shell script to /usr/NX/bin/nxwrapper
    #!/bin/bash
    nxnode=${ps -o ppid= -p $PPID}
    nxagent=${pgrep -p $nxnode -u $USER -x nxagent}
    ${1+"$@"}
    exec kill $nxagent
  9.   Import the key in /usr/NX/keys/rsa_id.pub.key on to client. use custom for desktop manager specify path to nxwrapper and specify startfluxbox

Fix for "Cannot shutdown using power button" on Ubuntu


After my recent upgrade to ubuntu, pressing the power button to shut down stopped working. I had to remap the script mapped to the power button by

  1. Editing  /etc/acpi/events/powerbtn using the command
       sudo gedit  /etc/acpi/events/powerbtn
  2. Commenting line shown below by adding a # to the beginning  of the line
       action=/etc/acpi/powerbtn.sh
  3. adding a new line
       action=/sbin/poweroff
  4. Saved and exited Gedit. Tested to make sure the functionality is restored by pressing the  power button to shut down

Installing LIRC & Irxevent


  1. sudo apt-get install lirclirc-x mythbuntu-lirc-generator
  2. Select stream zap PC remote when asked.
  3. Do not select any IRblaster
  4. start lircd
  5. start irw and see if it detects any key presses
  6. Copy the attached Lircmap.xml file into ~/.xbmc
  7. startxbmc and check if the remote works
  8. run mythbuntu-lirc-generator
  9. edit .lircrc and append ~/.lirc/common to the end of the file
  10. paste the attached common file in ~/.lirc/